Why Wood Floor Sanding Is the Key to a Lasting Floor Finish
Getting the Basics Right
Over the years I have seen a lot of floor finishes fail long before they should. The usual cause is not the varnish or the lacquer, but what happened before they were applied. Wood floor sanding is the single most important step in any restoration or new installation, and skipping corners here almost always leads to disappointment. A floor might look acceptable right after a quick sand, but within a year the finish can peel, scratch easily, or show every uneven board. Getting the sanding right takes time, the right tools, and a good understanding of the wood itself.
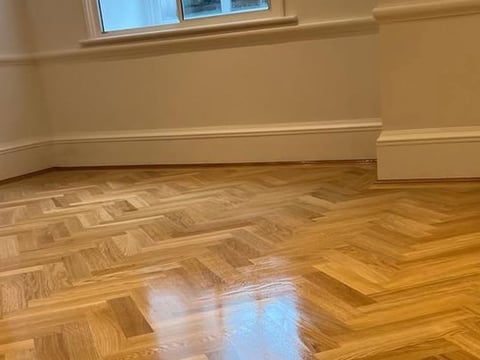
I remember working on a large parquet flooring job in a converted warehouse near Shoreditch. The client had tried to save money by doing the sanding themselves with a rented machine. They used cheap abrasive paper and no dust extraction system. After three weekends of work the floor looked patchy, the dust had settled into every gap, and the finish they applied bubbled within weeks. We had to strip everything back and start again. That job taught me that wood floor sanding is not something you can rush or do with inadequate gear. The time and cost of fixing a bad sanding job far outweighs the investment in doing it properly from the start.
Choosing the Right Floor Sanding Machine
The choice of floor sanding machine makes a huge difference. For most solid wood and engineered wood floors, a drum sander or a belt sander is the workhorse. I have used Lägler machines for years, and they are hard to beat for consistent results on large areas. They are heavy and require some muscle to control, but they leave a flat surface that needs little hand finishing. For parquet flooring or any floor with a pattern, a rotary or orbital sander is often safer because it is less aggressive across the grain. The trick is matching the machine to the floor type and the condition of the wood.
A common mistake is using too coarse a grit on the first pass. I have seen contractors jump straight to a 24-grit belt on a floor that only needed a light sand. That removes more material than necessary and creates deep scratches that are hard to remove later. For a typical Oak Flooring restoration, I start with 40-grit sanding belts if the floor has old finish or light damage. If the floor is in good shape, 60-grit is often enough. Each pass uses a finer grit, moving through 80, 100, and sometimes 120 for a final smooth finish. The dust extraction system needs to run continuously. Without it, fine dust clogs the abrasive paper and bakes onto the floor, causing swirl marks that show through the finish.
Surface Preparation and Filling
Before any sanding begins, the floor needs to be clean and free of debris. Nails and staples must be punched below the surface, or they will tear the sanding belts and ruin the abrasive paper. I always check for loose boards and fix them first. A board that moves during sanding will create a low spot, and that low spot will always be visible once the finish is applied. After the first sanding pass, I apply wood filler to any gaps, cracks, or knot holes. The filler needs to be compatible with the finish you plan to use. Some fillers react badly with certain lacquers and cause discolouration. I prefer water-based fillers for most jobs because they dry fast and take stain well.
For floors that are very uneven, a floor levelling compound can be used before sanding. But this is a trade-off. Levelling compounds work well under engineered wood or floating floors, but on solid wood they can crack as the wood moves with humidity. I only recommend them when the floor is badly out of level and the customer is willing to accept some risk. In most cases, careful sanding with a heavy machine can reduce minor dips and ridges without the need for compound.
Sanding Technique and Dust Control
Good wood floor sanding is about consistent pressure and overlapping passes. You never stop the machine on the floor because the drum or belt will leave a dig mark. You keep moving, at a steady speed, and you overlap each pass by about a third of the width. For large rooms, I work in sections, always sanding in the direction of the boards. Sanding across the grain with a drum sander leaves scratches that are very hard to remove. If you do need to sand across the grain, use an orbital sander with fine grit and accept that it will take longer.
Dust extraction is not optional. A good system, like those built into Lägler machines or a separate industrial vacuum connected to the sander, captures most of the dust at source. This keeps the work area clean, reduces health risks, and improves the sanding quality. When dust is left on the floor, it gets ground into the wood by the next pass, dulling the abrasive and creating a muddy surface. I have seen floors that looked fine after sanding but showed a grey haze once the finish was applied, because dust particles were embedded in the wood. That haze is almost impossible to remove without resanding.
Choosing the Right Finish
Once the sanding is complete and the floor is clean, the choice of floor finish matters as much as the preparation. For high-traffic commercial areas, a hardwearing lacquer or varnish is best. I often use Bona products for their durability and ease of application. They offer a range of finishes from matt to high gloss, and their water-based systems are low in odour and dry fast. For residential floors where the owner wants a more natural look, Osmo oils and hard wax oils are popular. They penetrate the wood and leave a soft sheen that feels warm underfoot. The trade-off is that oiled floors need more maintenance than lacquered ones. They need to be recoated every year or two, and spots that get heavy use may show wear sooner.

Another option is a hard wax oil that combines the look of oil with better durability. I have used Osmo Polyx Oil on many oak floors and it holds up well in kitchens and hallways. The key is to follow the manufacturer's instructions for application and drying time. Rushing the finish leads to uneven sheen and poor adhesion. I always let the floor dry fully between coats, and I sand lightly with a very fine abrasive paper between coats to ensure a smooth finish.
Contract Sanding and Professional Work
For large projects, contract sanding is often the most efficient approach. This means hiring a specialist company that handles the sanding and finishing as a separate package. I have worked with London Floor Restoration on several commercial jobs where the floor area was over a thousand square metres. They bring multiple machines, a dedicated dust extraction system, and a team that knows how to handle different wood types and finishes. The cost is higher than doing it yourself, but the results are consistent and the project finishes on time. For a hotel lobby or a retail space, that reliability is worth the expense.
In one project, we had to match the finish on a new parquet flooring section to an existing floor that was forty years old. The old floor had been waxed and had a deep patina. Matching it required careful sanding to remove the old wax without going too deep, then applying a tinted lacquer to blend the colours. The contract sanding team used a combination of drum sanders and edge sanders, and they tested the finish on a sample area before touching the main floor. That kind of care is hard to achieve with a one-person operation.
Maintenance Between Sanding
Even the best sanding job will not last forever. Floors need maintenance. For lacquered floors, a regular clean with a pH-neutral cleaner and a microfibre mop keeps the surface free of grit that can cause scratches. For oiled floors, a maintenance oil applied every six months in high-traffic areas helps the finish last longer. When the floor does start to show wear, a light sanding with a fine grit and a new coat of finish can bring it back without a full strip and sand. This intermediate refresh is much cheaper and faster than starting from scratch.
Knowing when to sand and when to just clean takes experience. I advise my clients to look at the floor in daylight. If the finish is dull or has fine scratches that catch the light, it is probably time for a light sand and recoat. If the finish is peeling or the wood is bare in places, a full strip and wood floor sanding is needed. Trying to patch a failing finish never looks good. The new finish will sit on top of the old and will peel at the edges of the patched area.
In the end, wood floor sanding is about patience and precision. It is the foundation that every other step rests on. Whether you are working with solid wood, engineered wood, or parquet flooring, the principles are the same. Use the right machine, the right grit sequence, and good dust control. Choose a finish that suits the use of the room. And maintain the floor properly after the work is done. A floor that is sanded well will look good for years and will be easier to maintain than one that was rushed. That is the difference a professional approach makes.